Facebook Like

https://www.facebook.com/muangpuzomi

This is default featured slide 1 title

Go to Blogger edit html and find these sentences.Now replace these sentences with your own descriptions.

This is default featured slide 2 title

Go to Blogger edit html and find these sentences.Now replace these sentences with your own descriptions.

This is default featured slide 3 title

Go to Blogger edit html and find these sentences.Now replace these sentences with your own descriptions.

This is default featured slide 4 title

Go to Blogger edit html and find these sentences.Now replace these sentences with your own descriptions.

This is default featured slide 5 title

Go to Blogger edit html and find these sentences.Now replace these sentences with your own descriptions.

4/23/15

Xiaomi Redmi

Font သြင္းရန္ ၂ နည္း ရိွသည္။ Mi 3, Mi 4 တို႕တြင္ developer rom ျဖစ္ပါက theme ေျပာင္းရံုျဖင့္ ရသည္။ Mi Policy အသစ္ အရ ၎တို႔၏ designer server ေပၚတင္မထားေသာ Thrid Party Theme , Components မ်ားကို သြင္း ခြင့္ မေပးေတာ့ပါဘူး။ ဒါေၾကာင့္ Redmi 1s , Redmi Note တို႕တြင္ Root လုပ္ရသည္။

For Developer ROM

Developer ROM ကို အသံုးျပဳထားလွ်င္ Font File ကို သြင္းႏိုင္ပါသည္။ RoboZawgyi.mtz ကို download ခ်ပါ။
Phone ကို Computer နဲ႕ ခ်ိတ္ၿပီးေတာ့ SD card သို႕မဟုတ္ Phone ထဲကို ထည့္ပါ။
Theme app ကို ဖြင့္ပါ။ Local Tab ကို သြားပါ။ Menu button ကို ႏိွပ္ၿပီး Import from SD card ကို ေရြးပါ။
Download ခ်ထားေသာ robozawgyi.mtz ကို ေရြးေပးပါ။
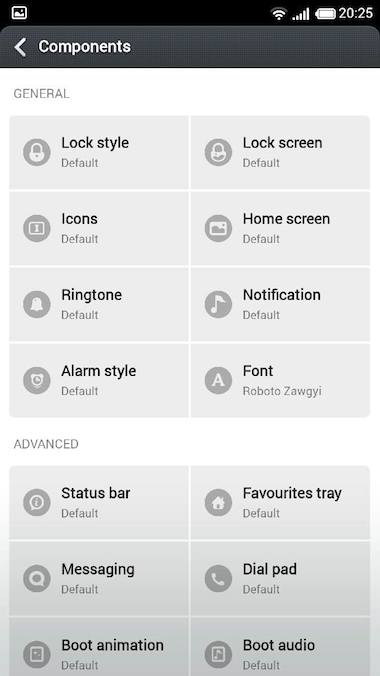
ၿပီးလွ်င္ Category tab ကို သြားပါ။ Components > Font > Local ေအာက္က robozawgyi ကို ေရြးပါ။ Apply လုပ္ပါ။
Font

With iFont

iFont ကို အသံုးျပဳၿပီးေတာ့လည္း ျမန္မာ font သြင္းႏိုင္ပါသည္။ ျမန္မာစာ တစ္ခု တည္းျမင္ရဖို႕ အတြက္ root မလုပ္ခ်င္ရင္ iFont ျဖင့္ ဦးစြာ စမ္းသပ္ႏိုင္ပါသည္။
Player Store မွ iFont ကို ပထမ download ခ်ပါ။
ၿပီးလွ်င္ zawgyi20084.3.apk ကို ဦးစြာ download ခ်ၿပီး သြင္းပါ။
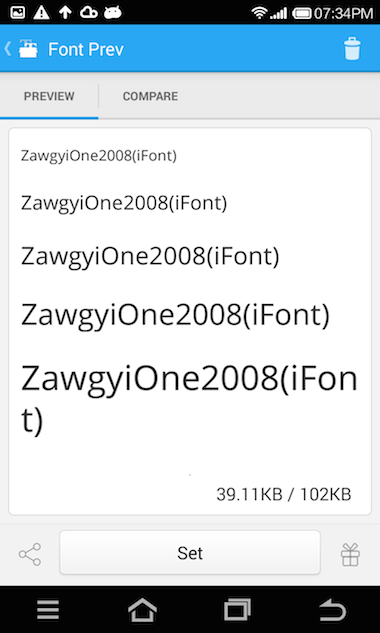
iFont ကို ဖြင့္ပါ။ MY tab ကို သြားပါ။
iFont
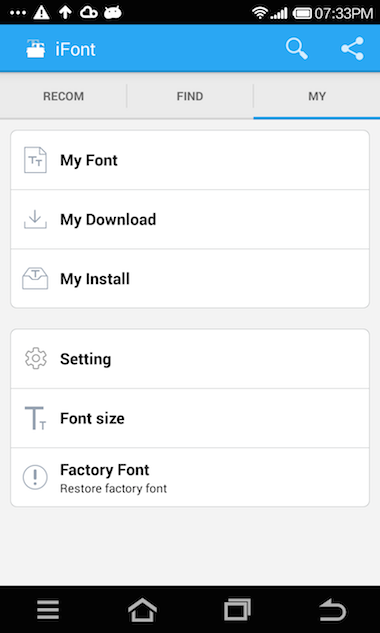
Zawgyi2008 ကို ေတြ႕ပါမည္။ ႏိွပ္လိုက္ပါ။
iFont
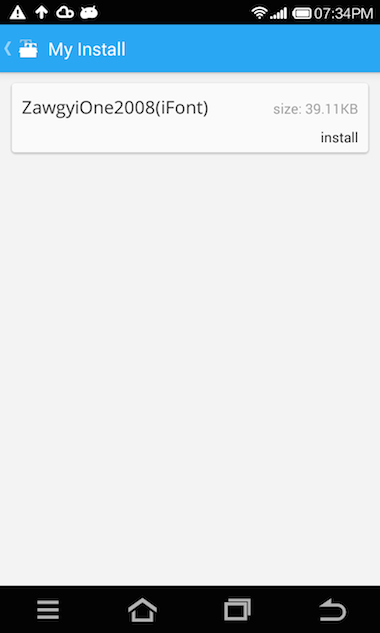
ၿပီးလွ်င္ Set လုပ္ပါ။
iFont
ၿပီးလွ်င္ OK ႏိွပ္လိုက္ပါ။ Theme app တက္လာပါမည္။ မတက္လာပါက Theme ကို ဖြင့္ပါ။
ၿပီးလွ်င္ Category tab ကို သြားပါ။ Components > Font > Local ေအာက္က Zawgyi2008(iFont) ကို ေရြးပါ။ Apply လုပ္ပါ။
အကယ္၍ iFont နည္းျဖင့္ ျမန္မာစာ မျမင္ရလွ်င္ Font ကို Default ျပန္ထားၿပီး root လုပ္ရန္ လိုအပ္ပါသည္။

For Root

ျမန္မာ keyboard ႏွင့္ font သြင္းရင္ Play Store မွ MM Aio Font Changer ကို Download ခ်ပါ။
Aio Font changer ကို ဖြင့္ပါ။ Xiaomi ဖုန္းရဲ႕ Andorid verison ေပၚမူတည္ၿပီး Tab ေပၚက Android Version ကို ေရြးေပးပါ။ ယခု အခ်ိန္တြင္ Redmi , Redmi Note တို႕သည္ Android 4.2 ျဖစ္သည္။ Mi 3 , Mi 4 တို႕ သည္ android 4.4 ျဖစ္သည္။
AIO
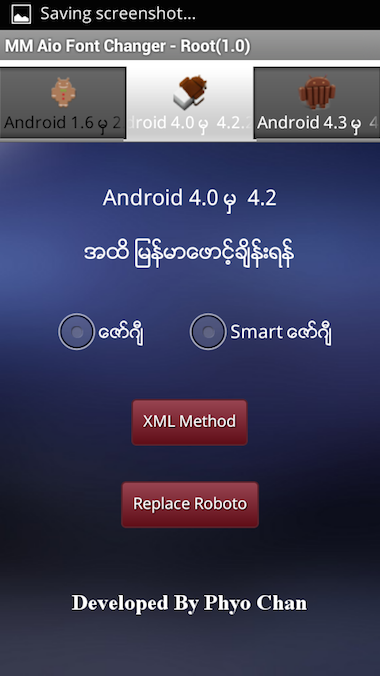
Android 4.0 မွ 4.2 အတြက္ Smart ေဇာ္ဂ်ီ ကို ေရြးပါ။ XML Method ကို ႏိွပ္ပါ။ Root permission ေမးလွ်င္ Allow လုပ္လိုက္ပါ။ ၿပီးလွ်င္ ေဇာ္ဂ်ီ ျမင္ရပါမည္။
MIUI ကို Update လုပ္ၿပီးလွ်င္ XML Method ျဖင့္လုပ္ထားလွ်င္ ျမန္မာ font ေပ်ာက္သြားပါမည္။
ျပန္လည္ root လုပ္ၿပီး XML Method ကို ျပန္ သြင္းေပးဖို႕လိုပါသည္။
Replace Roboto နည္းလမ္းကို မတိုက္တြန္း ပါ။
အဘယ့္ေၾကာင့္ဆိုေသာ system font ကို အစားထိုးသြားေသာေၾကာင့္ ျဖစ္သည္။
ထို နည္းသည္ Root Explorer အသံုးျပဳၿပီး font အစားထိုး ျခင္း ျဖင့္ အတူတူ ပင္ျဖစ္သည္။

Keyboard

Frozen Zawgyi Keyboard ကို အသံုးျပဳႏိုင္ပါသည္။
Keyboard သြင္းၿပီးပါက Settings -> General settings -> Language & Input -> Keyboard & Input Methods တြင္ Default ကို Frozen Zawgyi Keyboard Pro ကို ေရြးၿပီး အသံုးျပဳႏိုင္ပါသည္။

4/14/15

Computer connection

Internet Options>connections. If you are on a LAN,click "LAN settings".
Pawlkhat te buai theih na Computer pan Google Connections lut thei lo
Chrome ahih leh Setting>Show advanced setting>Change proxy setting>Connection>anuai 

lam ah Lan setting ah lut beh in la,Automatically detest setting ah man(Tick) pia 

lecin,Anuai Proxy server ah man aom leh tua phiat khia kik ding ki sam hi tua dan in a om 

aa na hih kik nak leh ki ngah kik ding hi 

4/12/15

Window မှာ Password ခံကပြီး ပြန်မဖွင့်တက်ခြင်း

If you mean user account password, you can use Hiren to reset the password.

Download the Hiren from the following URL.
http://www.hirensbootcd.org/download/

Burn CD or Write it to Thumbdrive
http://www.hirensbootcd.org/burning/
http://www.hirensbootcd.org/usb-booting/

Follow the instructions from the following URL to reset your password.
http://www.hirensbootcd.org/resetting-windows-password/

4/6/15

Laptop TouchPad Cursor problem te a ding in a hoih mahmah

Thuma sa in na TouchPad a kizat theih kei leh koi bang dan in hoih kik sak thei ding cih nop na hi  a nuai aa ka koih link te na download in la na sin in 


Gen teh na in a mawk mawk aa ki ngah lo a hih leh Windows Update kul pian cih na hi aa
Khat guak na Update nop leh hih a nuai aa link na mek in 
Hih na mek in-Download

Tua khit ciang Download

4/2/15

Lenovo A536 Android 4.4.2 Root PC Myanmar

Image result for lenovo a850

Lenovo A536 Android 4.4.2 ကို VROOT(iRoot) ျဖင့္ Root ေဖါက္ျပီး ျမန္မာစာထည့္နည္း


ဒီပိုစ့္ကလုပ္နည္းကေတာ့ ကြန္ပ်ဴတာနဲ႔ လုပ္ရမယ့္ နည္းပဲျဖစ္ပါတယ္..။ Android 4.4.2 ကို အရင္ Root apk ေတြနဲ႔ Root ေဖါက္လို႔ မရတာမ်ားပါတယ္..။ ဒါေၾကာင့္ Kingo Root Tool နဲ႔လည္း Root ေဖါက္လို႔ အဆင္မေျပတဲ့သူမ်ားအတြက္ VROOT(iRoot) နဲ႔ Root ေဖါက္နည္းကို ထပ္တင္ေပးလိုက္ပါတယ္..။ VROOT(iRoot) ကို ႏွစ္မ်ိဳးသံုးလို႔ ရေအာင္ Portable (Chinese) နဲ႔ Setup (English) ဆိုျပီး သီးျခားစီ တင္ေပးထားတာျဖစ္ပါတယ္..။ Portable နဲ႔ အဆင္မေျပတဲ့သူမ်ားရွိခဲ့ရင္ Setup ဖိုင္ကို မိမိတို႔စက္ထဲမွာ Install ထည့္ျပီး အသံုးျပဳႏိုင္ပါတယ္..။ Setup ဖိုင္ကို Install ထည့္တဲ့အခ်ိန္မွာေတာ့ အင္တာနက္ရွိဖို႔လိုပါတယ္..။ Lenovo Android Devices ေတြအတြက္ Drivers ေတြကို ဒီပိုစ့္မွာပါ တင္ေပးထားျပီး.. မိမိတို႔စက္ထဲမွာ မရွိေသးဘူး၊ ကြန္ပ်ဴတာက ဖုန္းကို မသိေသးဘူး ဆိုရင္ေတာ့ Root မလုပ္ခင္ အရင္ဆံုး Drivers ေတြကို Install ထည့္ေပးလိုက္ပါ..။ Android USB Drivers ထည့္နည္းေတြကို အရင္ပိုစ့္ေတြမွာလည္း ေရးေပး၊ ရွင္းျပေပးခဲ့ျပီးမို႔ ဒီပိုစ့္မွာ ထပ္မေရးေပးေတာ့ပါ..။ Android ဖုန္းေတြရဲ႕ Drivers ေတြကို ကြန္ပ်ဴတာက သိမွသာ ဖုန္းေတြကို Root ေဖါက္လို႔ ရမွာ ျဖစ္ပါတယ္..။ Android 4.4.2 ကို ျမန္မာစာ ထည့္နည္းကေတာ့ အရင္ Kingo Root ပိုစ့္က ေဆာ့ဝဲလ္ေတြနဲ႔ လုပ္နည္းအတိုင္းပါပဲ..။ အသံုးျပဳလိုတဲ့သူမ်ားကေတာ့ အရင္ဆံုး ေအာက္ကလင့္ေတြကေန ေဆာ့ဝဲလ္ေတြကို ေဒါင္းယူထားႏွင့္လိုက္ပါဗ်ာ..။

VROOT(iRoot) Portable 13 MB - (Chinese Version)

 VROOT Setup 7 MB (English Version)

 Lenovo Driver 1.2 - 10 MB

 ေအာက္မွာေတာ့ Zawgyi Changer and Busy Box
 (OR)

ေဆာ့ဝဲလ္ေတြ ေဒါင္းယူထားျပီးရင္ေတာ့ အရင္တုန္းက ပိုစ့္ေတြမွာ ေျပာခဲ့ျပီးတဲ့အတိုင္း ဖုန္းရဲ႕ Setting >> About Phone >> Build Number မွာ ၇-ခ်က္ (7-times) ေတာက္ျပီး ေအာက္ကပံုေလးေတြအတိုင္း Developer Options ကို ေဖၚလိုက္ပါ..။ ျပီးရင္ အဲဒီ Developer options ထဲက USB Debugging မွာ အမွန္ျခစ္ေပးပါ..။ ေနာက္တဆင့္ကေတာ့ Setting >> Security >> Unknown sources မွာလည္း အမွန္ျခစ္သြားတပ္ေပးပါ..။ ျပီးရင္ေတာ့ ဖုန္းနဲ႔ ကြန္ပ်ဴတာကို via USB cab ၾကိဳးနဲ႔ ခ်ိတ္ဆက္လိုက္လို႔ ရပါျပီ..။
ေအာက္ကပံုေလးကေတာ့ Portable (Chinese) နဲ႔ ျပေပးလိုက္တာပါ..။ လုပ္နည္းကအတူတူပါပဲ..။ Portable နဲ႔ အဆင္မေျပတဲ့သူမ်ားရွိခဲ့ရင္ Setup ဖုိင္နဲ႔ အသံုးျပဳေပးပါ..။

ေအာက္ကေတာ့ Setup (English) နဲ႔ အသံုးျပဳျပထားတာျဖစ္ပါတယ္..။ ေအာက္ကပံုေလးအတိုင္း ေပၚလာရင္ ဖုန္းနဲ႔ကြန္ပ်ဴတာကို ခ်ိတ္ဆက္ေပးလိုက္ပါ..။ ၂-မိနစ္ခန္႔ေစာင့္လို႔ မမိေသးရင္ ၾကိဳးကို ျဖဳတ္လိုက္ တပ္လိုက္ လုပ္ၾကည့္ေပးပါ..။ မွ်ားအျပာနဲ႔ ျပထားတဲ့ Root Tool မွာ အမွန္ျခစ္တပ္ဖို႔ မေမ့ပါနဲ႔..။


အေပၚကပံုအတိုင္း ဖုန္း ေမာ္ဒယ္နံပါတ္ေတြ ေပၚလာရင္ Root ကို ႏွိပ္လိုက္လို႔ ရပါျပီ..။ မိမိတို႔ရဲ႕ ဖုန္းမွာလည္း ေအာက္ကပံုေလးအတိုင္း ေပၚေနမွာ ျဖစ္ပါတယ္..။
VROOT(iRoot) မွာ ေအာက္ကပံုေလးေတြ အတိုင္း ဆက္တိုက္ေပၚလာျပီးရင္ေတာ့ မိမိတို႔ဖုန္း Restart က်သြားပါလိမ့္မယ္..။ ၂-မိနစ္ခန္႔ ခဏေစာင့္ေနေပးလိုက္ပါ..။
ေအာက္ကပံုေလးအတိုင္း Complete စာသားေပၚလာရင္ေတာ့ Lenovo A536 ကို က်ေနာ္ Root ေဖါက္လို႔ ရသြားျပီ ျဖစ္ပါတယ္..။

ဖုန္းရဲ႕ Screen မွာ အေပၚကပံုေလးအတိုင္း ေပၚေနတတ္မွာျဖစ္ျပီး Root Access ေတာင္းတဲ့ေဆာ့ဝဲလ္ေတြကိုေတာ့ ေအာက္ကပံုေလးေတြအတိုင္း ဖုန္းမွာ အမွန္ျခစ္ေပးျပီး ႏွိပ္ေပးလိုက္ပါ..။

Root Checker နဲ႔ စစ္ၾကည့္တဲ့အခါမွာလည္း အမွန္ျခစ္တပ္ျပီး ႏွိပ္ေပးလိုက္ပါ..။ အဆင္ေျပသြားပါျပီ..။

Kingo Root ပိုစ့္မွာ တင္ေပးခဲ့ျပီးတဲ့ Zawgyi Installer ေတြကိုပဲ အသံုးျပဳခဲ့တာျဖစ္ပါတယ္..။ ဒါေၾကာင့္ ေအာက္ကပံုေလးအတိုင္း Busy Box ကို အရင္ Install ထည့္ျပီးမွ Zawgyi Changer ကို အသံုးျပဳလို႔ရမွာ ျဖစ္ပါတယ္..။ ဒီပိုစ့္မွာ ျမန္မာစာထည့္တာ သိပ္မရွင္းတဲ့သူမ်ားရွိခဲ့ရင္ Kingo Root ပိုစ့္ကို ဒီေနရာမွာျပန္ၾကည့္ေပးပါ..။
အေပၚပံုအတိုင္း ေခါင္းစဥ္စာသားေတြ မရွင္းေသးရင္ေတာ့ ေအာက္ကပံုေလးအတိုင္း MM Aio Font Changer ေလးကို ဆက္ထည့္ေပးလိုက္ရင္ အဆင္ေျပသြားပါတယ္..။


အေပၚပံုမွာလို SMS Message ေနရာမွာလည္း စာေတြ ေရးလို႔ ရသြားျပီျဖစ္ပါတယ္..။ ေအာက္မွာ ျမင္ရတဲ့ပံုေလးေတြအတိုင္း ေခါင္းစဥ္စာသားေတြပါ မွန္သြားျပီ ျဖစ္ပါတယ္..။