Facebook Like

https://www.facebook.com/muangpuzomi

This is default featured slide 1 title

Go to Blogger edit html and find these sentences.Now replace these sentences with your own descriptions.

This is default featured slide 2 title

Go to Blogger edit html and find these sentences.Now replace these sentences with your own descriptions.

This is default featured slide 3 title

Go to Blogger edit html and find these sentences.Now replace these sentences with your own descriptions.

This is default featured slide 4 title

Go to Blogger edit html and find these sentences.Now replace these sentences with your own descriptions.

This is default featured slide 5 title

Go to Blogger edit html and find these sentences.Now replace these sentences with your own descriptions.

5/25/16

THIS COPY OF WINDOW IS NOT GENUINE" ျပႆနာ ေျဖရွင္းနည္း


"This copy of window is not genuine"  ဆိုတဲ့ ျပႆနာကို ၾကံုဖူးသူေတြ ရွိၾကမယ္ထင္ပါတယ္။

အေတြ႕အၾကံဳရွိသူေတြကေတာ့  "ဒါေလးမ်ားကြာ... Window Loaderေလး Run ေပးလိုက္ေပါ့"  ဆိုျပီး အလြယ္တကူေျပာၾကပါလိမ့္မယ္။ Window Loader ကို Run ေပးရံုနဲ႔ မရတဲ႔ Window ေတြရွိေနပါေသးတယ္....

ေအာက္ကပံုလို Install ေနရာမွာ ႏွိပ္မရပဲ မွိန္ေနတာမ်ိဳးပါ...


ဒီလို ၾကံဳလာခဲ့ရင္ ဘယ္ Window Loader ကို Run Run အဆင္မေျပႏိုင္ပါဘူးခင္မ်ာ..။အဲ့ဒီျပႆနာကို လြန္ခဲ့တဲ႔  July 02, 2012ေန႔က ဒီေနရာမွာ  တင္ထားေပးပါတယ္။


ေျဖရွင္းနည္းကို...

 ဒီေန႔ Window 7 တင္ထားတဲ႔ က်ေနာ့စက္တစ္လံုးမွာ ေျဖရွင္းရင္း Post ကို Update လုပ္ေပးလိုက္ပါတယ္။

လိုအပ္တဲ႔ Window Loader နဲ႔ WAT FIX ကို အရင္ေဒါင္းယူပါ။1.77MB ပဲရွိပါတယ္ ။


Download Window Loader & WAT FIX

[ဘာမွ မလုပ္ခင္ မိမိတို႔စက္က Antivirus ကို ခဏပိတ္ထားေပးပါ။ ဒီ Window Loader ကို Antivirus ေတြက Virus အျဖစ္ သတ္မွတ္တဲ႔ အတြက္ Runမရႏိုင္တာမ်ိဳးေတြ ရွိတတ္ပါတယ္]


  Rar ဖိုင္ကိုျဖည္လိုက္ရင္ ဖိုဒါလ္ ေလးႏွစ္ခု ထြက္လာမွာပါ... WAT Fix နဲ႔Window Loader ႏွစ္ခုပါ...။

ပထမ ဆံုး WAT Fix ကို Right Click - Run as administrator နဲ႔Run ေပးလိုက္ပါ....


 25:00 မိနစ္ ဝန္းက်င္ခန္႔ ၾကာပါတယ္ ...ဘာမွလုပ္ေပးစရာ မလိုပါဘူး 100% ျပည့္ေအာင္ ထိုင္ေစာင့္ေနရံုပါပဲ.... ျပီးတာနဲ႔  Restartခ်ေပးပါ ...။


Window ျပန္တတ္လာရင္ ေစာေစာက ေဒါင္းယူထားတဲ႔ ဖိုဒါလ္ ထဲက ဒုတိယဖိုင္လ္ ျဖစ္တဲ႔ Window Loader ကို Right Click - Run as administrator နဲ႔ Run ေပးျပီး Install ကို ႏွိပ္ေပးလိုက္ပါ...။


ေအာက္ကပံုအတိုင္း သူ႕ဘာသာသူ အလုပ္ လုပ္ေနပါလိမ့္မယ္... 5:00 မိနစ္ခန္႔ၾကာပါတယ္... ေစာင့္ေနလိုက္ပါဦး....:D


  ေအာက္ကပံုေလးထဲကအတိုင္း တတ္လာျပီဆိုရင္....


Restart ကိုႏွိပ္ေပးလိုက္ပါ..... 

 Window ျပန္တတ္လာရင္............ ေအာက္ကပံုေလးလို Window Activated ျဖစ္ေနပါလိမ့္မယ္။


xxxxxxxxxxxxxxxxxxxxxxxxxxxxxxxxxxxxxxxxxx

ေနာက္ဆံုးဘယ္လိုမွ အဆင္မေျပေသးဘူးျဖစ္ေနရင္ ဒီ Chew-WGA v0.9Loader ကို ေဒါင္းယူျပီး Right Click - Run as administrator Run ေပးလိုက္ပါ။ ျပီးတာနဲ႔ အလိုေလွ်ာက္ Restart က်သြားပါလိမ့္မယ္။


   အားလံုး Window အမွန္ေလးေတြကိုယ္စီ နဲ႔ လန္းႏိုင္ၾကပါေစဗ်ားးးးးး.....:)

 REMO RECOVER 4.0 PRO FULL VERSION


 အေၾကာင္းေၾကာင္းေၾကာင့္ မွားယြင္းျပီး Delete လုပ္မိတဲ႔ ဓါတ္ပံု၊ Video ၊ Music ၊ Software စ တာေတြ အားလံုးကို Remo Recover နဲ႔ အလြယ္တကူ ျပန္ယူႏိုင္ပါတယ္။

 မွား ဖ်က္မိတဲ႔ Partition ကိုေတာင္ Recover လုပ္ယူႏိုင္တယ္လို႔ ဆိုထားပါတယ္..။

က်ေနာ့ကိုယ္္ေတြ႕တစ္ခုအေနနဲ႔ေျပာရမယ္ဆိုရင္...

  (3rd July 2013) ရက္ေန႔ကပါ..... 

သူငယ္ခ်င္းတစ္ေယာက္ရဲ႕ iPad 3 ကို IOS 5.1.1 မွ IOS 6.1.2 ကိုတင္ေပးရာက... စေတြ႕ခဲ့တာပါ...

ကြန္ပ်ဴတာ Space နည္းေနတာကို သတိမထားမိလိုက္ပဲ Backup လုပ္လိုက္တာပါ..။


 IOS 6.1.2 တင္အျပီး Backup လုပ္ထားတဲ႔ဖိုင္လ္ကိုျပန္ထည့္မယ္လုပ္ေတာ့Backup ဖိုင္လ္ မရွိပါဘူးဆိုျပီး Error Message တတ္လာတယ္..။

ဟိုက္ ! :(

  ေခါင္းေတြ နပန္းေတြၾကီးျပီး သူငယ္ခ်င္းကိုလည္းအရမ္းအားနာသြားမိတယ္...

ရွိသမွ် ဓါတ္ပံုေတြ အမွတ္တရ ရိုက္ထားတဲ႔ ပံုေတြ အားလံုး ေပ်ာက္သြားတာပါ... 

စိတ္မေကာင္းျခင္းမ်ားစြာနဲ႔ပဲ အိမ္ျပန္လာခဲ့ပါေတာ့တယ္... ။

အိမ္ျပန္ေရာက္ေတာ့ စုထားသမွ်  Recovery Software ေတြကို ရွာေဖြျပီး အဲ့ဒီထဲက ဒီ Remo Recover  ေဆာဖ္ဝဲလ္ ေလးနဲ႔ ရလိုရျငား Recover လုပ္ၾကည့္လိုက္တယ္....


Wowwww ......  မယံုႏိုင္စရာပါပဲ.... 


  ဓါတ္ပံုေတြ Video ေတြ အားလံုးနီးပါး ရွိေနတာကိုေတြ႕ရပါေတာ့တယ္...။

ခ်က္ခ်င္း သူငယ္ခ်င္းဆီကို ဖုန္းဆက္ျပီး ဓါတ္ပံုေတြ Video ေတြ ျပန္ရျပီ ျဖစ္ေၾကာင္း အားရဝမ္းသာ ေျပာျပလိုက္တယ္။

ကဲ... မိတ္ေဆြတို႔လည္း အခုလို ေပ်ာက္သြားတာမ်ိဳး , မွားဖ်က္မိတာမ်ိဳးေတြရွိရင္ ဒီ Software ေလးနဲ႔သာ ျပန္ယူလိုက္ပါ ၉၀% ေလာက္ ျပန္ယူႏိုင္ပါတယ္... :)

Software ကို Key ထည့္တဲ႔ ေနရာမွာ မသိရင္ ရြာလည္တတ္ပါတယ္.. ရြာမလည္ရေလေအာင္ Key ထည့္နည္းေလးပါ ေျပာျပလိုက္ပါတယ္..။

 Keygen ကို Run လိုက္ပါ ...


Off line Register ကိုႏွိပ္ပါ 

 Key ထည့္ေပးရမဲ့ ေနရာ ႏွစ္ေနရာ ရွိပါတယ္..

  အေပၚက အကြက္ေလးမွာ မွဳန္ဝါးဝါးနဲ႔ ေပၚေနတဲ႔ နံပါတ္ေလးေတြကို Copy ကူး ျပီး 

Keygen ညာဘက္ေဘးက  0000-0000  ဆိုတဲ႔ေနရာမွာ ထည့္ေပးျပီး Generate ကိုႏွိပ္ပါ..

 ေပၚလာတဲ႔ Key ေတြကို Copy ကူးျပီး Register လုပ္ေပးလိုက္ပါ အျမဲတမ္းသံုးလို႔ရသြားပါျပီ....။

Click Here to Download   OR Download Here  OR
Download Here
OR
Download Here

How Do I Know If My Samsung Galaxy Phone is Genuine or Fake/Cloned?

Samsung’s line of Galaxy phones runs on Android. Since Android is an open source operating system, thesource code of the OS is open to all interested parties under open source licenses. Some phone manufacturers take advantage of this by creating knock-offs of more popular devices. These companies have done quite a good job to lure consumers into buying their fake phones at a very low price. Here is a list of ways to identify a fake or cloned Samsung Galaxy device.

Perform a Physical Check-up to Distinguish a Fake Galaxy Phone from a Real One

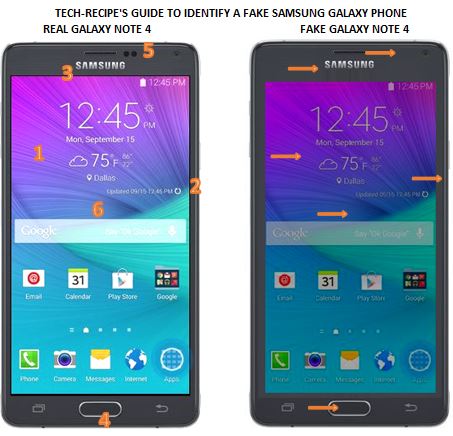
Whether you are using a Samsung Galaxy Note 4, Note 3, S5 or S4, some imitations are obvious enough to be easily identified. If the device in question has any of the signs below, chances are, that device is fake.

1.Check on the screen’s brightness and vibrancy. Samsung’s AMOLED screen sports vibrant and lively colors on-screen. Fake devices show dull colors.

2.Check the space from the screen to the edge. Cloned phones have a wide gap from the edge of the screen to the edge of the phone.

3.Run your fingers through the Samsung logoon the front screen. You can feel the Samsung logo on fake products. The name can be easily chipped off, too.

4.Check the hard buttons. Home buttons and volume buttons have abnormal gaps on the fake Galaxy phones.

5.Check the phone sensors. Some sensors are missing or misplaced on Galaxy replicas.

6.Check the screen’s glass material. Run your fingers through the screen. If it feels like plastic more than glass, then the device is bogus.

Know a Cloned Galaxy Phone Through Its Performance

Some fake Galaxy phones are so convincing that one can hardly see any physical differences from the real product. However, when put to performance tests, phony devices will drag down. Try these tests:

1.Multi-task by opening multiple applications. Play music in the background while opening other applications. Do not close applications. Instead, press the Home button and open other applications. Fake phones will either run slow or hang.

2.Test the camera. Take multiple pictures. Notice the speed of how pictures were taken. Knock-offs will drag down. Photo quality of fake Galaxy phones are unsatisfactory, too.

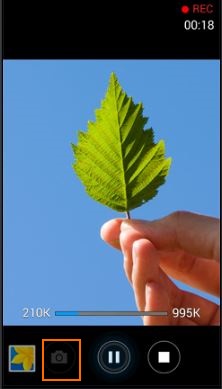
3.Most high-end Galaxy phones can take pictures while recording a video. Knock-offs do not have the function.

Use Samsung Kies to Identify a Real Galaxy Phone

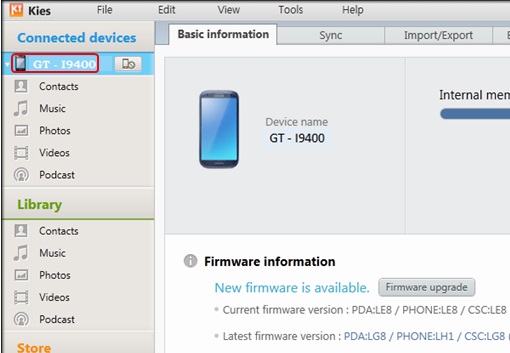
The most reliable way of knowing the authenticity of any Samsung Galaxy device is by using Samsung Kies. Samsung Kies will scan your device and display important information about it. To use Samsung Kies to identify your phone, follow these steps:

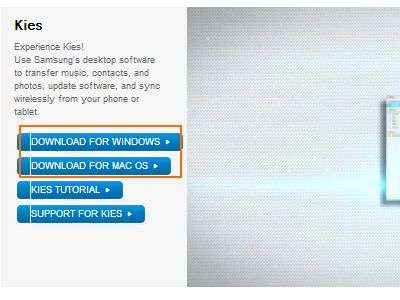
1.Download and install Samsung Kies on your PC.

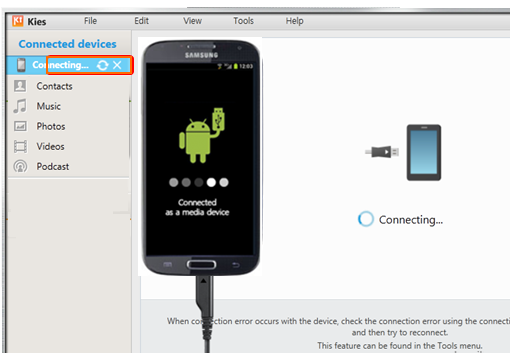
2.Using a USB connector cable, connect your phone to your computer.

3.Wait for Kies to display your device’s name and the firmware information of your phone. This is a sign that the phone is genuine.

4.If the device is not recognized, connect it again. If Kies still does not recognize your device, chances are the phone is not a real Galaxy phone.

Use Samsung Codes to Know a Real Galaxy Phone

Samsung Galaxy phones have fixed codes that can be entered to test functions or view information about the device. You just simply input the codes in your dialer app and your phone should respond to it. If the phone does not show any response, then the Galaxy device you are holding is an imitation. These are the most common Samsung codes:

*#06# [Displays device IMEI number]
*#1234# [Displays device current firmware]
*#*#1472365#*#* [GPS test settings]
*#*#197328640#*#* [Service mode main menu]
*#*#4636#*#* [Diagnostic and general settings mode]
*#0*# [General Test Mode]
*#0228# [ADC Reading]
*#0283# [Audio Loopback Control]
*#0289# [Melody Test Mode]
*#03# [NAND Flash S/N]
*#0588# [Proximity Sensor Test Mode]
*#0589# [Light Sensor Test Mode]
*#0673# [Audio Test Mode]
*#07# [Test History]
*#0782# [Real Time Clock Test]
*#0842# [Vibra Motor Test Mode]
*#12580*369# [SW & HW Info]
*#1575# [GPS Control Menu]
*#2263# [RF Band Selection]
*#232331# [Bluetooth Test Mode]
*#232337# [Bluetooth Address]
*#232338# [WLAN MAC Address]
*#232339# [WLAN Test Mode]
*#2663# [TSP / TSK firmware update]

Do you have a fake Galaxy phone? Were you tricked into buying a cloned device? Do you have other tips for our readers? Share them in the comments section.

Authenticity Bluetooth

5/24/16

Windows 32 bit နဲ႔ 64 bit ကြာျခားခ်က္


Windows, Macintosh, Linux စတဲ့ Computer OS (operating system) ေတြမွာ 32 bit နဲ႔ 64 bit ဆုိၿပီး အမ်ဳိးအစား ႏွစ္မ်ဳိး ရွိပါတယ္။ တစ္ကယ္ေတာ့ 32 bit တုိ႔ 64 bit တုိ႔ဆုိတာ computer ရဲ႕ CPU (central processing unit) က အခ်က္အလက္ေတြကုိ ဘယ္လို ကုိင္တြယ္သလဲဆုိတဲ့ နည္းလမ္းေတြပဲ ျဖစ္ပါတယ္။ 64 bit OS ေတြက RAM (Random Access Memory) မ်ားမ်ားကုိ ကုိင္တြယ္ ေျဖရွင္းႏုိင္ၿပီးေတာ့ 32 bit ထက္ပုိ စြမ္းေဆာင္ရည္ ျမင့္ပါတယ္။

ဒါဆုိရင္ ရွိသမွ် computer ေတြအားလုံး 64 bit တင္လုိက္ရေတာ့မလား?

အဲလိုလည္း မဟုတ္ပါဘူး။ စြမ္းေဆာင္ရည္ ပုိျမင္တဲ့ 64 bit ကုိ တင္မယ္ဆုိရင္ 64 bit ကုိ ေမာင္းႏွင္ေပးႏုိင္တဲ့ CPU နဲ႔မွ ျဖစ္ပါမယ္။ မရွားေပမယ့္ စက္တုိင္းမွာ 64 bit run လုိ႔မရပါဘူး။ ဒါေၾကာင့္ 64 bit မေမာင္းႏွင္ႏုိင္တဲ့ computer မွာ 64 bit မတင္သင့္ပါဘူး။


ဒါဆုိ 64 bit ေမာင္းႏွင္ႏုိင္တဲ့စက္ ဟုတ္/မဟုတ္ ဘယ္လိုစစ္မလဲ?

၁။ ဘာနည္းပညာမွ မလုိဘဲ စစ္ေဆးနည္းကေတာ့ ဆုိင္ေတြမွာ စဝယ္ဝယ္ခ်င္း တင္ထားတဲ့ OS version ကုိအသုံးျပဳတာ အေကာင္းဆုံးပါပဲ။ ဝယ္တုန္းက 32 bit တင္ထားတယ္ဆုိရင္ ျပန္တင္တဲ့အခါမွာလည္း 32 bit တင္ပါ။ ဝယ္တုန္းက 64 bit တင္ထားရင္ ျပန္တင္တဲ့အခါ 64 bit ပဲတင္ပါ။

၂။ “မဟုတ္ေသးပါဘူး၊ နည္းပညာက်က် သိခ်င္တာ” ဆုိရင္ေတာ့ အလြယ္နညး္ တစ္ခုကေတာ့ ကုိယ့္ရဲ႕ Windows မွာ (Mac, Linux မရပါ) SecurAble ဆုိတဲ့ software ေလးတစ္ခုတင္ၿပီး စစ္ၾကည့္လို႔ရပါတယ္။ Download လုပ္ရတာလည္း file size မႀကီးပါဘူး။ Download လုပ္ၿပီး run လုိက္တဲ့အခါ

32 Maximum Bit Length

ဒီလိုေပၚရင္ 32 bit အထိပဲ တင္လို႔ရပါမယ္။

64 Maximum Bit Length

ဒီလိုေပၚရင္ေတာ့ 64 bit windows တင္လို႔ရပါတယ္။

၃။ ဒီ tool download လုပ္ဖုိ႔ အဆင္မေျပဘူးဆုိရင္ေတာ့ Control panel ကုိသြားပါ။ View by မွာ Small icons ကုိ ေရြးၿပီး Performance Information and Tools ကုိ ႏွိပ္ပါ။ ေအာက္ကပုံမွာၾကည့္ပါ။

Windows control panel

ေပၚလာတဲ့ထဲမွာမွ View and print detailed performance and system information ဆုိတာကုိ ႏွိပ္ပါ။

ပုံမွာျပထားတဲ့အတုိင္း 64-bit capable မွာ Yes လို႔ ေပၚရင္ 6

INSTALLING Windows XP IN 10 MINUTES!


STEP1 : After the Copy Part is Over ... System is Rebooted as we all know In general Foramatting Procedure...
Now After Reboot The Below Image Will Appear....


STEP 2: Now As This Image APPEARS You Have to Press  "Shift + F10 "  . This Will Open The command Prompt...  Now type  taskmgr in it. This will open the Task manager .

STEP 3 : After The task Manager Opens Goto Processes ... And Find "Setup.exe"  process and Right CLICK on It.... and set the Priority to Highest....


STEP 4: Now Just Watch the Set It will take around 9 minutes and 2 minutes for Tolerance(depends System to system)....

Thats the Overall Tutorial...Hope You all Have LIKED IT...

So When you Format your PC Next Time It will Really Save Your TIME i.e around 20 to 25 minutes...

Install Windows 7 in 10 minutes

Once the installation starts to expand the Windows files, hit SHIFT + F10. This will bring the command prompt window. Type in taskmgr to load task manager.

Once the Task Manager is loaded go toProcess Tab. Right click on setup.exe set priority to High or Realtime. That’s it. This will emphasize the installation job. Optionally you can also assign the CPUs by going to Set Affinity.

This however doesn’t significantly affect the installation process. Until and unless you use some Solid State Drives or USB Flash drive as a source of Windows 7 installation files.

Xiaomi Note 4G Firmware

Xiaomi Note 4G Firmware Download 100% Test


ကြ်န္ေတာ္ကိုယ္တိုင္ စမ္းသပ္ေအာင္ျမင္ထားေသာ Firmware ျဖစ္ပါတယ္ခင္ဗ်ာ

စိတ္ခ်လက္ခ် ေဒါင္းလုပ္ဆြဲႏိုင္ပါတယ္ခင္ဗ်ာ

Xiaomi Note 4G Firmware Download

password - www.sithumobile.com

MTK Droid Tool V2.5.3

MTK Droid Tool V2.5.3


MTK Droid Tool V2.5.3
MTK devices Firmware Backup
MTK devices IMEI Backup
MTK devices IMEI Restore

Download

Sp Flash Tool V5

Sp Flash Tool V5


Sp Flash Tool V5 Version

MTK Device Firmware restore

Download

I Root

I Root


I Root
Android Phone All Root
Download

Kingo Root

Kingo Root


Android Phone All Root
Use Internet
Download

enovo A536 Full Backup Firmware 100%

enovo A536 Full Backup Firmware 100% Test Download

Lenovo A536 Full Backup Firmware 100% Test Download

password - www.sithumobile.com

5/23/16

Android ဖုန္းထဲက မွားျပီးဖ်က္လုိက္မိတဲ့ မက္ေဆ့ေတြ၊ဖိုင္ေတြကို ဘယ္လုိျပန္ယူမလဲ


ဖုန္းထဲမွာသိမ္းထားတဲ့ အေရးၾကီးတဲ့ဖိုင္ေတြ၊ဓာတ္ပုံေတြ၊ဗီဒီယိုေတြကို မေတာ္တဆ delete လုပ္လုိက္မိပါသလား။

ဒါဆုိရင္ေတာ့ အခုခ်က္ခ်င္း ဖုန္းကိုပါ၀ါပိတ္ျပီး၊ SD ကတ္ကုိ ျဖဳတ္ထားေပးပါ။ စာဖတ္သူ မေတာ္မဆမွားျပီး၊ ဖ်က္လုိက္မိတဲ့ဖိုင္ေတြကို ျပန္ယူႏိုင္မယ့္ နည္းလမ္းရွိပါတယ္။

သတိျပဳရမွာက တကယ္လုိ႔ SD ကတ္ကို ျဖဳတ္မထားမိဘူးဆုိရင္၊ ဖုန္းဟာ ေနာက္ထပ္ဖိုင္ေတြကို SD ကတ္ထဲ overwrite လုပ္သြားမွာျဖစ္တာေၾကာင့္ ျပန္ယူလုိ႔မရျဖစ္သြားႏိုင္ပါတယ္။

၁။ ပထမဦးဆုံး သင့္ကြန္ျပဴတာအတြက္လုိအပ္တဲ့ Recovery ေဆာ့ဖ္၀ဲကို ေဒါင္းလုဒ္ဆြဲပါမယ္

Recovery လုပ္ႏိုင္တဲ့ေဆာ့ဖ္၀ဲေတြအမ်ားၾကီးရွိေပမယ့္ Dr.Fone ေဆာ့ဖ္၀ဲက အေကာင္းဆုံးနဲ႔ Delete လုပ္မိလုိက္တဲ့ဖုိင္ေတြကို ျပန္ယူႏိုင္မွဳအျမင့္ဆုံးေဆာ့ဖ္၀ဲျဖစ္ပါတယ္။

Dr.Fone ေဆာ့ဖ္၀ဲကို ေအာက္ပါလင့္ခ္မွာ ေဒါင္းလုဒ္လုပ္ျပီး သင့္ကြန္ျပဴတာမွာ install လုပ္ေပးပါ။ ဒီေဆာ့ဖ္၀ဲဟာ Windows XP ကေန အခု Windows 10 အထိ အဆင္ေျပေျပသုံးႏိုင္ျပီး root လုပ္ထားတဲ့ဖုန္းေတြေကာ၊ မလုပ္ရေသးတဲ့ဖုန္းေတြမွာပါ သုံးႏိုင္ပါတယ္။


(၂) သင့္ Android ဖုန္းကို PC နဲ႔ ခ်ိတ္ဆက္ပါ။
ကြန္ျပဴတာမွာ Wondershare Dr.Fone ေဆာ့ဖ္၀ဲကို run လိုက္ျပီဆုိရင္၊ သင့္ Android ဖုန္းကို USB ၾကိဳးနဲ႔ ကြန္ျပဴတာကို ခ်ိတ္ခိုင္းပါလိမ့္မယ္။

drfone-android-sc01

(၃) USB debugging ကို ဖြင့္ေပးပါ။

ဒီအဆင့္မွာေတာ့ သင့္ဖုန္းထဲကေန USB debugging ကို ဖြင့္ေပးဖုိ႔ လုိပါမယ္။

    Android 2.3 အေစာပုိင္းဖုန္းေတြမွာဆုိရင္ – Settings ထဲ၀င္၊ ‘Applications’ ကို ႏွိပ္၊ ‘Development’ ကို ေရြးေပးျပီး၊ ‘USB debugging’ ဆုိတာကို အမွန္ျခစ္ေပးလုိက္ပါ။

drfone-android-sc02

    Android 3.0 နဲ႔ 4.1 ဖုန္းေတြမွာဆုိရင္ေတာ့ – Settings ထဲ၀င္၊ ‘Developer Options’ ကို ႏွိပ္၊ ‘USB debugging’ ဆုိတာကို ရွာျပီး၊ အမွန္ျခစ္ေပးလုိက္ပါ။

drfone-android-sc04

    Android 4.2 နဲ႔အထက္ တစ္ခ်ိဳ႔ဖုန္းေတြမွာဆုိရင္ – Settings ထဲ၀င္၊ ‘About Phone’ ဆုိတာထဲ ထပ္၀င္ျပီး၊ ‘Build Number’ ဆုိတဲ့ေနရာကို (၇) ခါဆက္တိုက္ႏွိပ္ေပးလုိက္ရင္၊ ‘You are under developer mode’ ဆုိတဲ့ စာေလးေပၚလာပါလိမ့္မယ္။ ဒါဆုိရင္ Settings ထဲျပန္သြား၊ ‘Developer Options’ ကို ေရြးျပီး၊ ‘USB debugging’ ဆုိတာကို အမွန္ျခစ္ေပးလုိက္ပါ။

drfone-android-sc04

    ဖုန္းတစ္လုံးနဲ႔ တစ္လုံး ‘USB debugging’ ေရြးတာက မတူႏိုင္တာေၾကာင့္၊ အဆင္မေျပတာရွိရင္ comment box မွာ လာေရာက္ေမးျမန္းႏိုင္ပါတယ္။

( သတိျပဳရာမွက – ဒီအဆင့္ေတြမွာ ကိုယ့္ဖုန္းမွာ USB debugging ကို အမွန္မျခစ္ထားတဲ့လူေတြအတြက္ ျဖစ္လုိ႔၊ USB debugging ဖြင့္ျပီးသားလူေတြက အထက္ပါအဆင့္ကို ေက်ာ္သြားႏိုင္ပါတယ္)

(၄) ဖုန္းထဲကေဒတာေတြကို Analyze လုပ္မယ္။

USB debugging လုပ္ျပီးရင္၊ Dr.Fone ေဆာ့ဖ္၀ဲနဲ႔ သင့္ဖုန္း ခ်ိတ္ဆက္လုိ႔ျပီးပါျပီ။ ဖုန္းထဲက ေဒတာေတြကို analyze လုပ္ေပးရမယ့္အဆင့္ေရာက္ပါျပီ။ ‘Start’ ဆုိတာကုိ ႏွိပ္လုိက္ပါ။

drfone-android-sc05

ဒီမွာလည္း သတိျပဳရမွာက – ‘Start’ မလုပ္ခင္မွာ၊ သင့္ဖုန္းဘက္ထရီက အနည္းဆုံး ၂၀ ရာခုိင္ႏွဳန္းေက်ာ္ ပါေစ။ ဘက္ထရီအရမ္းနည္းေနရင္၊ ေဒတာေတြကိုကြန္ျပဴတာက စစ္ေဆးလုိ႔မျပီးခင္မွာ ဖုန္းပါ၀ါက်သြားႏိုင္ပါတယ္။

Start လုပ္လုိက္တဲ့အခါ၊ သင့္ Android ဖုန္းထဲမွာ မက္ေဆ့တစ္ခုေပၚလာပါလိမ့္မယ္။ ‘Allow’ ဆုိတာကို ႏွိပ္ေပးလုိက္ပါ။ အကယ္၍ ‘Allow’ ႏွိပ္ျပီးတာေတာင္ ကြန္ျပဴတာက analyze မလုပ္ေသးဘူးဆုိရင္၊ ဖုန္းမွာ ‘Allow’ ေပၚေနေသးလား ေသခ်ာၾကည့္ၾကည့္ပါ။ တစ္ခ်ိဳ႔ဖုန္းေတြမွာ ‘Allow’ ဆုိတဲ့မက္ေဆ့ ေပ်ာက္သြားတဲ့ အထိ ႏွိပ္ေပးဖုိ႔လုိပါတယ္။


drfone-android-sc06

(၅) ကုိယ္ျပန္လုိခ်င္တဲ့ဖိုင္အမ်ိဳးအစားကို ေရြးေပးပါ။

စကင္ဖတ္တဲ့အခ်ိန္သိပ္မၾကာေစဖုိ႔အတြက္၊ ကိုယ္အဓိကထားျပီး ျပန္လုိခ်င္တဲ့ဖိုင္အမ်ိဳးအစား (ဥပမာ – ဓာတ္ပုံ၊ ဗီဒီယို၊ မက္ေဆ့) စသျဖင့္၊ ကိုယ္လိုခ်င္တဲ့ဖုိင္အမ်ိဳးအစားကို အမွန္လုိက္ျခစ္ေပးပါ။ ရွိသမွ်ဖိုင္ေတြ အကုန္ျပန္လုိခ်င္ရင္၊ ‘Select All’ ဆုိတာကို ႏွိပ္လုိက္ပါ။

select-the-type-of-files


‘Scan for deleted files’ ဆုိတာကိုပဲ ေရြးေပးပါ။ ဒီနည္းနဲ႔ စကင္ဖတ္တာက ပုိျမန္ပါတယ္။ ဒါေပမယ့္ ဒီနည္းနဲ႔ စကင္ဖတ္လုိ႔မရဘူးဆုိရင္ေတာ့၊ ‘Advanced Mode’ ကေန စကင္ဖတ္ေပးရပါမယ္။ Advanced နဲ႔ စကင္ဖတ္တာက အခ်ိန္ေတာ္ေတာ္ၾကာလုိ႔၊ ပထမနည္းနဲ႔ပဲ စကင္ဖတ္ျပီး မရမွ၊ ‘Advanced Mode’ ကို သုံးပါ။


select-a-storage-scanning-mode


(၆) စကင္ဖတ္ပါ။

ကိုယ္ ျပန္လိုခ်င္တဲ့ဖုိင္ေတြကို ေရြးျပီးျပီဆုိရင္ ‘Start’ ဆုိတာကို ႏွိပ္ျပီး၊ စကင္ စဖတ္လုိ႔ရပါျပီ။ စကင္ဖတ္ေနစဥ္မွာ ဖုန္းနဲ႔ ကြန္ျပဴတာကို မျဖဳတ္ပါနဲ႔။


scanning


(၇) ကိုယ္လုိခ်င္တဲ့ဖုိင္ကို ျပန္ယူပါ

စကင္လုပ္တာက နည္းနည္းေတာ့ၾကာပါလိမ့္မယ္။ စကင္ျပီးသြားတဲ့အခါ၊ သင္ delete လုပ္လိုက္မိတဲ့ဖုိင္ေတြ ထဲက၊ ျပန္ရႏိုင္တဲ့ဖိုင္ေတြ ေပၚလာပါလိမ့္မယ္။


ကိုယ္ျပန္လုိခ်င္တဲ့ဖိုင္ေတြေတြ႔ရင္၊ ေဘးနားက box ေလးမွာအမွန္လုိက္ျခစ္ေပးပါ။ ျပီးရင္ ေအာက္နားက ‘Recover’ ဆုိတာကိုႏွိပ္ျပီး ဖ်က္လုိက္မိတဲ့ဖုိင္ေတြကို ျပန္ယူႏိုင္ပါတယ္။ Contacts ေတြကို ျပန္ယူတဲ့အခါ၊ CSV, vCard ဒါမွမဟုတ္ HTML format နဲ႔ save လုပ္ေပးဖုိ႔လုိ္ျပီး၊ မက္ေဆ့ေတြဆုိရင္ CSV (သို႔) HTML format နဲ႔ save လုပ္ေပးပါ။
preview-the-data

iOS Device ေတြကုိ Passcode ေမ့သြားလုိ႕ Firmware ျပန္တင္ခ်င္သူမ်ားအတြက္


iOS Device ေတြကုိ Passcode ေမ့သြားလုိ႕ဘယ္လုိျပန္လုပ္ရမလဲလုိ႕ေမးထားတဲ့ သူေတြအတြက္ Firmware ျပန္တင္နည္းေလး
ကုိျပန္လည္မွ်ေ၀ေပးလုိက္ပါတယ္။ iOS Device ေတြမွာ Passcode ေမ့သြားရင္ေတာ့ အမ်ားဆုံးက Firmware ျပန္တင္ရတာမ်ားပါတယ္။
Passcode ျပန္ျဖည္ႏုိင္တဲ့ နည္းလမ္းရွိေပမဲ့ Passcode ေမ့ေနတဲ့အခ်ိန္မွာ ဖုန္းနဲ႕ computer နဲ႕ခ်ိတ္ဆက္ရင္ Driver မသိေတာ့တာေၾကာင့္
အဆင္မေျပျဖစ္တက္ပါတယ္။ ဒီလုိအခ်ိန္မွာ ဘယ္လုိျပန္လုပ္ရမလဲဆုိရင္ေတာ့ iOS ေတြက Android ေတြလုိ Recovery mode ကေန
၀င္ေရာက္ျပီး Factory Data Reset ခ်လုိ႕အဆင္မေျပတာေၾကာင့္ Firmware ျပန္တင္မွသာအဆင္ေျပႏုိင္မွာ ျဖစ္ပါတယ္။
ဒီလုိအေျခအေနမွာ Firmware ျပန္တင္ဖုိ႕အတြက္ဆုိရင္ေတာ့ ေမးစရာရွိလာပါမယ္။ ဖုန္းကုိက်ေတာ္တုိ႕ computer ကေန iTune နဲ႕ခ်ိတ္ဆက္
ျပီးျပန္တင္ရမွာျဖစ္တဲ့အတြက္ computer ကေန ဖုန္းကုိမသိတဲ့အခ်ိန္မွာ ဘယ္လုိလုပ္ႏုိင္ပါသလဲလုိ႕ေမးလုိ႕ရပါတယ္။ အဲဒါေၾကာင့္ က်ေတာ္
computer ကေနဖုန္းကုိ Driver သိရွိေစရန္ Recovery mode ကေန computer မွ iTune နဲ႕ ခ်ိတ္ဆက္ျပီး Firmware တင္နည္းေလးမွ်ေ၀ေပးလုိက္ပါတယ္။ ဒီနည္းလမ္းက service သမားတုိင္း နဲ႕ iOS User အခ်ိဳ႕အတြက္ကေတာ့ သိရွိျပီးသားဆုိေပမဲ့ မသိေသးတဲ့သူေတြလဲ
ရွိလုိ႕ေမးျမန္းလာတာေၾကာင့္ တင္ေပးလုိက္ျခင္းျဖစ္ပါတယ္။
အရင္ဆုံးလုိအပ္တာကေတာ့ Computer မွာ iTune ဆုိတဲ့ Software ရွိဖုိ႕လုိအပ္ပါတယ္။ iTune software မရွိပါက Download အရင္ရယူပါ။
Download iTune >>> https://www.apple.com/itunes/
Download ရယူျပီးရင္ေတာ့ iTune Setup.exe အား computer မွာဖြင့္ျပီး iTune Software အား install ျပဳလုပ္ပါ။
Computer မွာ iTune ရရွိျပီဆုိရင္ေတာ့ ဖုန္းအတြက္ လုိအပ္တာကေတာ့ Firmware ပဲျဖစ္ပါတယ္။ iOS Device ေတြက Firmware တင္မယ္ဆုိကုိယ့္မွာရွိတဲ့ Firmware က Lastest ျဖစ္ဖုိ႕လုိအပ္ပါတယ္။ Firmware မရွိပါက ခုလက္ရွိ Lastest version Firmware အား ေအာက္ကလင့္ကေနDownload ရယူပါ။
iOS Lastest version Download >>> http://www.myanmarmobileapp.com/category/ios-firmware
Firmware ရယူျပီးရင္ေတာ့ ေနာက္တစ္ဆင့္အေနနဲ႕ Computer ကုိ Internet connection ရရန္ျပဳလုပ္ေပးရပါမယ္။ iOS Firmware တင္တဲ့အခါ computer မွာ Internet Connection ရွိရန္လုိအပ္ပါတယ္။ ဒါေၾကာင့္ Computer သုိ႕ ဖုန္းတစ္လုံးလုံးကေနျဖစ္ျဖစ္ internet ရရွိေစႏုိင္မဲ့ တေနရာရာကေန Internet Connection လႊင့္ေပးထားပါ။ Computer မွာ internet connection ရျပီဆုိရင္ေတာ့ Passcode က်ေနတဲ့ iOS Device ကုိ Power ဖြင့္ထားရက္နဲ႕ပဲ Home Key + Power Key ကုိတြဲျပီးႏွိပ္ထားလုိက္ပါ။ Power OFF သလုိမ်ိဴး Screen မွိတ္သြားပါမယ္။ မလႊတ္ပဲဆက္ဖိထားပါ Apple Logo တက္လာပါမယ္။ မလႊတ္ပဲဆက္ဖိထားေပးပါ။ ခဏေနရင္ iTune နဲ႕ USB Connect လုပ္ခုိင္းတဲ့ပုံေလးေပၚလာပါမယ္။ ဒါဆုိသင့္ရဲ႕ iOS Device မွာ Recovery mode ကုိေရာက္ရွိျပီျဖစ္ပါတယ္။ ဖုန္းကုိ Computer နဲ႕ခ်ိတ္ဆက္ေပးလုိက္ပါ။ ခဏေလာက္ေစာင့္ေပးပါ။ iTune Software အားဖြင့္စရာမလုိပါဘူး။ Computer ကေန iOS Deviceအားသိျပီဆုိရင္ iTune Software အလုိလုိပြင့္လာပါလိမ့္မယ္။ iTune Software ပြင့္လာတာနဲ႕ မိမိရဲ႕ iOS Device ရဲ႕ name နဲ႕အတူ Update နဲ႕ Restore ဆုိတဲ့စာတန္းေလးေတြပါ iTune Software မွာေပၚလာပါမယ္။ ဒီအေျခအေနေရာက္ျပီဆုိရင္ေတာ့ iOS Device အား Firmware တင္ႏုိင္ရန္ Shift key ကုိဖိထားျပီးRestore ဆုိတဲ့စာတန္းေလးကုိ ႏွိပ္ေပးလုိက္ပါ။ Box ေလးတစ္ခုေပၚလာပါမယ္။ Box ေလးထဲကေန ကုိယ္ Download ရယူထားတဲ့ Firmware ကုိ Location ေရြးေပးလုိက္ယုံပါပဲ။ iTune ကေန Firmware ကုိျဖည္ခ်သြားေပးျပီး iOS Device အား Firmware တင္ေပးသြားပါလိမ့္မယ္။ အခ်ိန္ၾကာတာကေတာ့ Internet Connectionအေပၚမူတည္ပါတယ္။


အဆင္ေျပပါေစ။
Welcome


Bootloader Unlock Software

 
Huawei , Sony , HTC Device ေတြအတြက္ Bootloader unlock ျပဳလုပ္ႏုိင္မဲ့
software ေလးကုိျပန္လည္မွ်ေ၀ေပးလုိက္ပါတယ္။ ဒီ software ေလးကုိအသုံးျပဳပုံေလး
ေတြကုိပါ Lesson Button ေလးနဲ႕ ရွင္းျပထားတာေလးပါ ပါတယ္။ ေရးသားမွ်ေ၀ေပးထား
သူကေတာ့ ကိုခ်မ္းေျမ႕ေအာင္( သု၀ဏၰနည္းပညာ) ျဖစ္ပါတယ္။ software ေလးလုိအပ္ပါက
Download ရယူလုိက္ပါ။


downloadbutton

Wondershare Dr.Fone for Android


ကုိယ့္ရဲ႕ Android ဖုန္း မွာ မွားဖ်က္လုိက္မိတဲ့ call history,contacts, messages, photos,video,audio file, notes စတာေတြကုိျပန္လည္ရယူနုိင္မယ့္  Wondershare Dr.Fone for Android ဆုိတဲ့ကြန္ပ်ဴတာေဆာ့၀ဲေလးကုိျပန္လည္မွ်ေ၀ေပးလုိက္ပါတယ္ ။ ဖုန္းထဲက Data ေတြကုိအမွန္တကယ္ျပန္လည္ရယူနုိင္တဲ့ေဆာ့၀ဲေကာင္း တစ္ခုျဖစ္ပါတယ္။

မူရင္း Website မွာေတာ့ ဒီေဆာ့၀ဲကုိေရာင္းပါတယ္။ အခုတင္ေပးထားတာကေတာ့ Full Version ပါ။ Full Version ျဖစ္ဖုိ႕လုိအပ္တဲ့ Serial Key file ေတြလည္းတစ္ပါတည္းပါ၀င္ပါတယ္။ ေအာက္က link မွာေဆာ့၀ဲေတြကုိရယူျပီး ကြန္ပ်ဴတာမွာ ေဆာ့၀ဲသြင္း ၊ ဖုန္းကုိကြန္ပ်ဴတာနဲ႕ခ်ိတ္ဆက္ျပီး အေရးၾကီး data ေလးေတြကုိျပန္လည္ရယူလုိက္ၾကပါဦး ။
=> Download Link <=

Lenovo A10-70 A7600

Lenovo A10-70 A7600
Password = lenovo8

Lenovo K3 Note K50-T5

Lenovo K3 Note K50-T5
Password = lenovo6